How to Grow Mint Herb from Seed
- Latin Name: Genus Mentha
- Hardiness Zone: Annual, Perennial Zones 4-9
- Days to Harvest: 60 days
- Days to Maturity: 80 days
- Days to Germination: 10-14
- Seeding Depth: ¼"
- Plant Spacing: 12-18"
- Plant Height: 12-24"
- Growth Habit: Aggressive, low-growing spreader
- Soil Preference: Fertile, consistently moist, well-drained
- Temp Preference: Temperate, 55-70°F
- Light Preference: Full sun
- Pests/Diseases: Mint has few known pests and diseases, and is actually believed to help deter common garden insects due to its naturally produced chemical menthol.
- Flavor: The genus Mentha has 36+ varieties of mint, each with their own unique minty notes

>>> See Full Herb Grow Guide List <<<
How to Grow Mint
Regardless of the variety of Mentha, mint is such a tenacious and hardy garden favorite that it is widely known to be invasive, especially when grown in its preferred habitat of moist, fertile, and rich soil. While there are two dozen species in genus Mentha and about half as many hybrids, every species of mint is going to share the same growing conditions reflective of its natural habit found growing along riverbanks in moist, humid, and well-drained spaces. However, because of its aggressive and weedy nature, most species of mint are also known to thrive in a variety of less-than-perfect soils.
Mint seeds are best if started indoors about 8-10 weeks prior to the final regional frost. Growers in warmer Zone 12 may seed mint directly outside in the fall for winter growth and maturity. When beginning indoors, plant 2-3 mint seeds per hole about ¼” deep and allow 7-14 days to germinate. Thin out the strongest seedlings as true leaves begin to emerge, gradually hardening off seedlings before transplanting to the garden. Mint prefers full sun but will tolerate partial shade in warm enough summers. Due to its invasive and wide-spreading nature in the garden, mint is generally recommended to be grown in pots, containers, and garden boxes.
Is Mint A Perennial?
Yes! Although most commonly grown as a summer annual, especially in more cooler northern grow zones, mint is a quickly spreading perennial that is generally found year-round along streams, banks, and many other temperate moist environments. Unlike woodier and more cold tolerant herbs such as rosemary, lavender, and thyme, mint will not overwinter below a Zone 12 and can only withstand a minimum cold of about 55°F. If growing in an outdoor container, bring mint indoors to overwinter near any full sun window.
Growing Mint in Pots
Like many herbs, mint thrives just as readily in pots and containers as it does out in the garden bed. After 8-10 weeks of starting seeds indoors, be sure to gradually harden off mint seedlings before transplanting to a container. Native to humid and consistently moist riverbanks, mint thrives in similarly fertile, moist, and well-drained soils with full sun. Pots and containers can be easily moved around to capture optimal daily sunlight. Once transplanted, be sure to provide mint an all-purpose fertilizer every 4-6 weeks to help establish and develop the best vegetative growth. While pots, containers, and planters are preferred for their ability to quickly drain and dry soil, mint species in Mentha require consistently moist soil and should be given an extra daily watering just in case. Avoid using any highly porous planters such as clay or terra cotta.

Growing Mint Indoors
Most species of mint only mature to about 12-24” tall and make convenient and aromatic full sun indoor favorites for pots and containers. Mentha thrives in humid, sunny climates and will grow just as readily in many homes and greenhouses. Follow the above tips for Growing Mint in Pots, since all mint grown indoors must be done so in some type of container. Avoid using any clay or terra cotta containers that will excessively dry out the soil. Although grow lights may help seeds germinate, be sure to provide maturing mint plants with as much full sun as possible to ensure the strongest and most aromatic crop. No full spectrum 6500K grow lights will ever substitute old fashion sunlight.
Fresh cut garden clippings may also be simply grown and propagated indoors hydroponically in a cup of water. After learning how to choose the healthiest selections from the garden, place the cuts of mint in a cold glass of water, changing both the water and the glass cup or jar every 5-7 days. Similar to basil, mint clippings will quickly develop roots while submerged and can be left to grow in either the glass or transplanted back outside into the soil.
Propagating Mint
Just like basil, rosemary, sage, and countless others, garden mint is actually easier propagated from established and mature cuttings rather than grown from seed. The use of fresh clippings is one of the most foolproof means to ensure healthy mint growth year after year and does not require any unnecessary rooting gels, fertilizers, or vermiculite. Propagating mint from a fresh cutting is as simple as four steps:
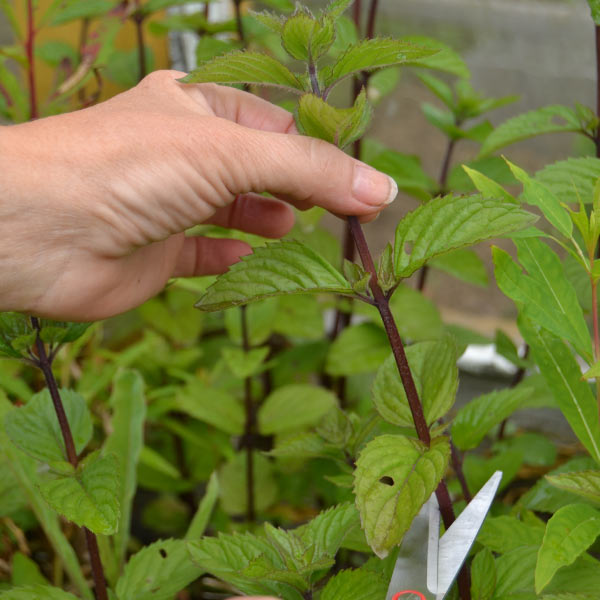
1. Clip a healthy 4-6” long stem of mint that has not gone to flower. Remove the bottom 2-3” worth of leaves from the clipping.
2. After removing the lower half of leaves from the cutting, place the bare end of the sprig into a glass of cold water, keeping all foliage and growth above the water line.
3. Long and spindly roots will begin to emerge within 14 days. Be sure to change the water and glass once every 5-7 days to minimize mold and mildew.
4. Mint should be ready to transplant at about 3-4 weeks from clipping. Bury the fresh root development in about 6-8” deep of potting soil.

How to Harvest and Prune Mint
Mint plants taste best and grow healthiest when routinely harvested and pruned back, as the younger and small leaves always taste better than older, more mature greens. If herbal plants are not harvested regularly they will expend most of their energy trying to produce a higher quantity of vegetative growth rather than higher quality of flavor. Regardless of variety, mint is one of the fastest spreading and most invasive herbs in the garden and should be pruned often for general upkeep. Whether pruning for care or harvesting for culinary use, clipping fresh mint generally follows the same guidelines as harvesting basil, balm, and other herbaceous classics.
- When harvesting for culinary use, clip off the top 2-3” of a sprig, removing the top tier of new leaf development and the tier beneath showing bigger, more established leaves.
- If pruning to manage growth, be sure to remove any sprigs that have gone to flower. Smaller, tighter, and more closely managed mint plants will not go to flower as readily.
Types of Mint Plant
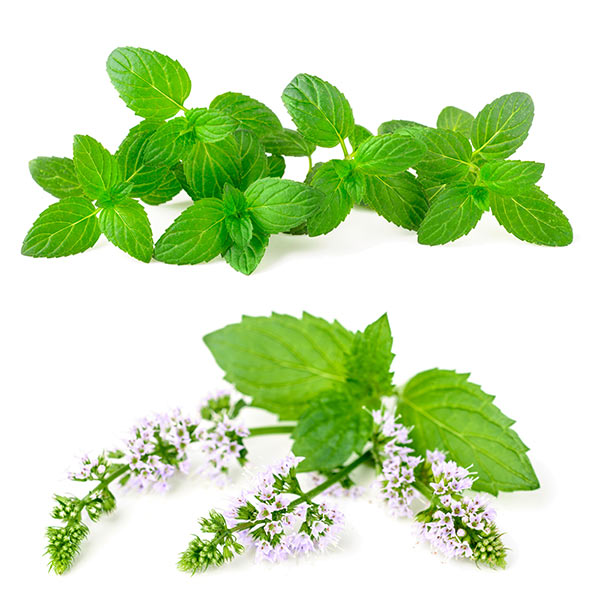
Although widely misunderstood to refer to a single herb plant, the term mint is actually a generic term used to identify any one of more than three dozen mint varieties. True heirloom cultivars of mint such as spearmint, watermint, applemint, and pennyroyal have all served as parent crops to some of the most beloved and prominent hybrids in all of gardening including peppermint, chocolate mint, and ginger mint. Similar in name and taxonomy, neither lemon mint, lemon balm, catmint, or catnip are as closely related to true mint as it would seem and none of them are classified under the genus Mentha. Some of the most popular cultivars of true mint include spearmint (Mentha spicata, peppermint (Mentha x piperita), and watermint (Mentha aquatica).

Benefits of Mint
Think leafy salad greens like spinach and kale, culinary mint is also synonymous with complete and thorough digestion. Menthol, the active oil in mint leaves, is proven to have both antiseptic and antibacterial benefits and shown to offer indigestion relief. Though not entirely conclusive, clinical studies continue to support that the aggressive, yet pacifying, menthol oil may help alleviate some symptoms of Irritable Bowel Syndrome (IBS).
The highly robust and curative alcohol aroma of menthol oil is also widely used to help treat symptoms of asthma, congestion, headaches, and nausea. Synthesized versions have been popularly created for a wide range of herbal remedies and topical ointments.
How to Make Mint Tea
Garden fresh mint tea is easy to brew and takes no longer than 10 minutes just like any other pot of tea. Mint leaves are soft, herbaceous, and contain a rich and potent supply the naturally derived menthol oil. How to brew Mint Tea:
1. Using any type of tea infuser or tea bag, add about 4 tsp of freshly dried mint to every 8 oz of boiled water.
2. Allow mint to steep for about ten minutes.
Mint Tea Benefits
First and foremost, it tastes excellent! Regardless of type, the genus Mentha is still just as popular today for bright minty flavor as thousands of years ago. And when compared to other garden fresh teas such as rosemary and lavender, mint truly does stand head and shoulders above the competition. Whether enjoyed dried or garden fresh, mint continues to boast the same therapeutic properties to help relieve indigestion through the help of the potent Mentha oil, menthol. And whether brewing tea leaves or enjoying them directly raw, mint flavor is still the preferred way to freshen breath, even after centuries of alternatives.

Drying Mint
Dried mint is just as easy to achieve as any other herb, requiring nothing more than a little patience. Regardless of the variety of garden mint, most culinary herbs are easily dried using either 1 of 3 dehydrating methods.
Hang Dry: Like any garden herb, cut about 5-6” of fresh growth per stem and bundle together. Hang the small mint bundle upside down in a dry, cool, and well-ventilated area. Herbs will not properly dry in overly humid spaces.
Oven Dry: Tender mint cuttings can be dehydrated in a convection oven at 175° F for 2 hours or until mint is brittle, cracking, and has lost its color.
Food Dehydrator: Herbs, fruits, and flowers are ideal for countertop food dehydrators for reliable and thorough drying. Food dehydrators feature step-by-step instructions for herbs and is the preferred method for many cooks and home gardeners. However, because mint is so fragrant, it is notorious for leaving behind a pungent influence well after dehydrating.


